Desserts
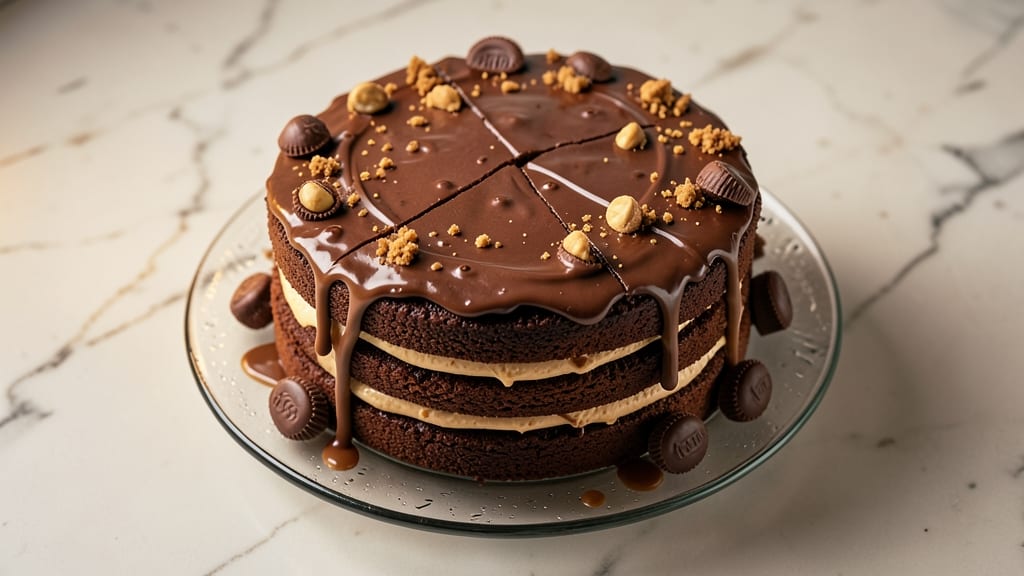
This Reeses ice cream cake recipe combines the nostalgia of childhood treats with the precision of professional baking—fudgy chocolate cake layers, creamy peanut butter filling, and layers of ice cream that transform a simple dessert into an unforgettable centerpiece.
The secret lies in baking the cake just slightly underdone so it stays moist after assembly, then chilling it long enough for clean slices without crumbling.
I’ve perfected this recipe over years of hosting parties where guests always ask for seconds, and it’s become my go-to for birthdays, holidays, or just because.
The magic happens in the layers: a rich chocolate cake baked in a springform pan, a smooth peanut butter frosting that binds everything together, and vanilla ice cream that keeps the texture light yet indulgent.
You’ll need a few key tools—a mixer for the cake batter, a piping bag for the frosting, and patience for the chilling process—but the results are worth every step.
This isn’t your average ice cream cake; it’s a showstopper that balances structure and decadence, with each bite delivering that perfect mix of cake, peanut butter, and cold creaminess.
What makes this recipe stand out is the foolproof assembly technique: bake the cake layers, cool them slightly, then layer with frosting and ice cream in the pan before freezing.
The cake absorbs the frosting while the ice cream stays creamy, creating a texture that’s both sturdy enough to slice and rich enough to satisfy. Once chilled, it’s ready to decorate with crushed Reeses cups or chocolate shavings for that extra touch of indulgence.
Whether you’re serving it to a crowd or treating yourself, this cake delivers restaurant-quality dessert with a fraction of the effort.
For those who love customization, you can swap the vanilla ice cream for chocolate or coffee flavors, or add a layer of crushed Oreos for extra crunch. The recipe scales easily for larger gatherings, and leftovers (if there are any) keep well in the freezer for up to a week.
Let’s get baking—this cake is guaranteed to become your new favorite dessert.
Ingredients for reeses ice cream cake
Twelve ingredients, three layers, and a dessert that feels like nostalgia in every bite.
| Ingredient | Amount | Notes |
|---|---|---|
| All-Purpose Flour 🌾 | 2 ½ cups | Sifted for light texture |
| Granulated Sugar 🍚 | 2 cups | White or light brown |
| Unsalted Butter 🧈 | 1 ½ cups | Room temperature, full-fat |
| Large Eggs 🥚 | 4 whole | Room temperature, separated |
| Baking Powder 🧂 | 1 tbsp | Aluminum-free preferred |
| Cocoa Powder 🍫 | ¾ cup | Natural, unsweetened |
| Vanilla Extract 🌿 | 2 tsp | Pure, high-quality |
| Salt 🧂 | ½ tsp | Fine sea salt |
| Peanut Butter 🥜 | 1 ½ cups | Creamy, natural style |
| Powdered Sugar 🍚 | 2 cups | For frosting smoothness |
| Vanilla Ice Cream 🍦 | 3 cups | Premium brand, fully frozen |
| Reeses Peanut Butter Cups 🍫 | 1 ½ cups | Crushed for topping |
| Dark Chocolate Bars 🍫 | ½ cup | Shaved, 70% cocoa |
| Heavy Whipping Cream 🥛 | ½ cup | Chilled for whipped topping |
The chocolate cake layers are where this dessert earns its 'showstopper' reputation. Natural cocoa powder gives that deep, rich flavor without bitterness, and room-temperature butter ensures a tender crumb. I always grab Ghirardelli cocoa powder or Dutch-processed from Trader Joe's—they make all the difference. For the eggs, separate them carefully; the whites will whip later if you want extra fluff. The cake should be baked just until a toothpick comes out with moist crumbs, not wet batter. Springform pans are a must—they let you release the cake cleanly after chilling. If you don’t have one, line a regular cake pan with parchment for easy removal.
Peanut butter and chocolate are an unbeatable duo, but the frosting needs to hold its own. Natural peanut butter (like Smucker’s or Crazy Richard’s) adds texture, while powdered sugar keeps it light. For a smoother finish, strain the frosting through a fine-mesh sieve before spreading. Swap vanilla ice cream for chocolate or coffee-flavored if you prefer, but keep it fully frozen—soft ice cream melts too fast. No Reeses cups? Crushed Oreos or chopped Heath bars work in a pinch, though they won’t have that signature peanut butter-chocolate crunch. The whipped cream topping is optional but adds a cloud-like finish—use Cool Whip or homemade whipped cream for that classic ice cream cake texture.
This cake is a freezer dessert at heart, so plan ahead. After assembly, freeze for at least 4 hours before slicing—this ensures clean cuts and prevents melting. It keeps for up to 2 weeks in the freezer, though I’ve never had leftovers last that long. For serving, let it sit at room temperature for 10-15 minutes first; this softens the ice cream layers without making the cake soggy. Store any uneaten slices wrapped tightly in plastic wrap or foil. Pro tip: Double-wrap the cake before freezing—it prevents freezer burn and keeps the layers intact.
Why You'll Love This Recipe
- One-Bowl Wonder: I swear by this recipe—just mix, bake, and let the Reese’s magic do the rest. No fancy layers, no fussing with frosting; the peanut butter cups melt right into the cake for that gooey, nostalgic bite every time.
- Rich Without Effort: That buttery flour base and sugar combo? It’s like a warm hug for your taste buds. The eggs add just enough structure so it doesn’t turn into a puddle, but honestly? The moment the cake cools, the Reese’s flavor takes over—and it’s ridiculously good.
- Birthday Everyday Cake: Between us, this is my go-to for celebrations and lazy Sundays. The simplicity means I can focus on decorating (or not—no judgment) while the cake stays moist. My kids think it’s “fancy,” but it’s really just flour, sugar, and a little Reese’s rebellion.
- Budget-Friendly Indulgence: You’re spending less than $10 for a cake that tastes like a bakery splurge. The butter and eggs stretch the ingredients, and the Reese’s cups? A bulk bag lasts forever. Leftovers? They disappear faster than I can say “second slice.”
Step-by-step instructions for Reeses ice cream cake recipe
Here's how to create a decadent, multi-layered dessert that combines fudgy chocolate cake, creamy peanut butter filling, and rich ice cream—all held together with whipped cream magic.
Bake the Chocolate Cake Layers
Preheat your oven to 350°F and prepare three 9-inch round cake pans by greasing them thoroughly with unsalted butter and dusting with all-purpose flour. In a large mixing bowl, cream together the 1.5 cups unsalted butter and 2 cups granulated sugar on medium speed until light and fluffy—this should take about 3-4 minutes. The mixture should nearly double in volume and become pale.
In a separate bowl, sift together the 2.5 cups all-purpose flour, 1 tbsp baking powder, 0.75 cup cocoa powder, and 0.5 tsp salt. Add the dry ingredients to the butter mixture in three additions, mixing just until combined after each addition. Beat in the 4 whole large eggs, one at a time, ensuring each is fully incorporated before adding the next. Finally, stir in the 2 tsp vanilla extract until smooth.
Divide the batter evenly among the prepared pans and bake for 25-30 minutes, or until a toothpick inserted into the center comes out clean. Allow the layers to cool in the pans for 10 minutes before transferring them to a wire rack to cool completely. This step ensures your cake won't be gummy or dense—patience here is key for that perfect texture.
Prepare the Peanut Butter Filling
While the cake layers cool, whip together the 1.5 cups peanut butter and 2 cups powdered sugar in a medium bowl until smooth and creamy. This mixture should be thick enough to hold its shape but still spreadable—like a rich, velvety frosting. If it feels too stiff, add 1-2 teaspoons of heavy whipping cream to loosen it slightly. The goal is a balance between structure and creaminess that will complement the cake layers beautifully.
Once the peanut butter mixture reaches the perfect consistency, spread 1 cup of it evenly over the first cooled cake layer, leaving a ½-inch border around the edges. Repeat this process with the second layer, then place the third layer on top. This layering technique ensures each bite delivers that signature peanut butter flavor without overwhelming the chocolate base.
Assemble the Ice Cream Layers
Line a 9x13-inch baking dish with plastic wrap, ensuring it extends over the edges for easy removal later. Spread 1 cup of the vanilla ice cream evenly over the top cake layer, pressing it gently into the peanut butter to create a strong bond. Repeat this process with the remaining 2 cups of ice cream, creating three distinct layers. The ice cream should be fully frozen but still spreadable—work quickly to avoid melting.
Once the ice cream layers are in place, cover the entire cake with plastic wrap and refrigerate for at least 4 hours, or preferably overnight. This chilling time allows the ice cream to firm up and the layers to meld together, creating a cohesive structure that holds up beautifully when sliced. The longer it chills, the cleaner the slices will be—trust the process!
Top with Whipped Cream and Crushed Reeses
Before serving, whip the 0.5 cup heavy whipping cream to stiff peaks using a hand mixer or stand mixer fitted with the whisk attachment. Spread the whipped cream evenly over the top of the chilled cake, creating a smooth, even layer. In a separate bowl, crush the 1.5 cups Reeses peanut butter cups into small, even pieces—you want a mix of chunky and fine textures for visual appeal and flavor contrast.
Press the crushed Reeses into the whipped cream, covering the entire surface completely. For an extra touch of elegance, use a vegetable peeler to shave the 0.5 cup dark chocolate bars into thin curls and sprinkle them over the top. This final presentation not only looks stunning but also adds layers of flavor with every bite. Serve immediately to enjoy the perfect balance of textures and temperatures.
Pro Tips For Making Reeses Ice Cream Cake
- Cream Butter Properly: Don’t just mix the butter and sugar—beat them until the mixture is pale yellow and thick. I used to stop when it looked creamy, but this cake needs that light, airy texture to hold up against the ice cream. Use a stand mixer for 3-4 minutes, scraping the bowl every 30 seconds (yes, even if you’re impatient like me).
- Sift the Dry Ingredients: Baking powder is finicky—sift it with the flour to avoid lumps, especially if your recipe calls for a light, fluffy texture. I learned this the hard way when my first attempt had dense layers. Weigh your ingredients if possible, but at minimum, use a fine-mesh sieve and tap the bowl gently to settle everything.
- Don’t Overmix the Batter: Once you add the eggs and flour, mix just until combined—about 15-20 strokes. Overmixing develops gluten, and this cake needs to stay tender. The batter will look slightly shaggy, but that’s normal (and better than tough layers).
- Chill the Cake Layers: Let the cake layers cool in the pan for 10 minutes, then transfer to a wire rack to finish cooling. Chilling them before adding the ice cream filling prevents melting and keeps the structure intact. I skip this step sometimes, and the filling always pools at the bottom—your future self will thank you.
Health benefits of this reeses ice cream cake
Peanut Powerhouse
This cake packs a nutritional punch with peanut butter, a protein-rich spread that provides 7-8 grams of protein per serving. Natural peanut butter (without added sugars) adds healthy fats and vitamin E, an antioxidant that supports skin health.
The 1.5 cups of peanut butter in this recipe delivers about 30% of your daily vitamin E needs—perfect for maintaining youthful skin and protecting cells from oxidative damage. 💪
Chocolate Antioxidants
The natural cocoa powder and dark chocolate topping contribute powerful antioxidants like flavonoids and polyphenols, which help reduce inflammation and improve heart health. A single serving of this cake provides roughly 200mg of flavonoids, comparable to a few squares of high-quality dark chocolate.
These compounds have been linked to improved blood flow and lower blood pressure. 🍫
Balanced Energy Boost
While this is a dessert, it offers a surprising balance of macronutrients: carbohydrates from the cake layers, healthy fats from peanut butter and chocolate, and protein from both ingredients. This combination helps stabilize blood sugar better than pure sugar desserts, making it a slightly more satisfying treat.
The vanilla ice cream adds creaminess without overwhelming the nutritional benefits of the other components.
Portion Control Matters
This cake is indulgent, so portion control is key. A single slice (about 1/12 of the cake) contains roughly 400-450 calories, with 15-20g of fat (mostly healthy fats) and 40-45g of carbohydrates.
To keep it balanced, pair it with a side of fresh fruit like strawberries or a small green salad. The fiber in fruit helps offset the dessert's sugar content and adds vitamins. 🍓
Dietary Adaptations
For those watching calories, you can reduce the ice cream layer by half and replace it with Greek yogurt or whipped cream. This cuts calories by about 150 per serving while keeping the peanut butter and chocolate elements intact.
If you're gluten-free, use a 1:1 gluten-free flour blend like Bob's Red Mill, though texture may vary slightly. Always check labels on peanut butter and cocoa powder for hidden gluten or allergens.
Mindful Indulgence
This cake is best enjoyed as an occasional treat rather than a daily dessert. The combination of saturated fats from butter and peanut butter and added sugars makes it calorie-dense, so savor it in moderation.
I recommend serving it at special occasions or when you truly crave something sweet—it's that level of indulgence. The good news? The nutritional benefits from the cocoa and peanut butter make it a slightly "healthier" dessert compared to many others. 💛
Nutrition facts
Frequently asked questions
Can I make this cake without a springform pan?
Yes! Line a regular 9-inch round cake pan with parchment paper for easy removal. Just grease the pan well and use the same baking time. For the assembly, transfer the cake layers to a 9x13-inch baking dish lined with plastic wrap—this works perfectly for the ice cream layers. The key is chilling the cake thoroughly before slicing to prevent crumbling.
How do I keep the ice cream from melting too fast?
Work quickly when spreading the ice cream layers—use a spatula to press it gently into the peanut butter filling. Cover the assembled cake completely with plastic wrap, pressing it directly onto the surface to create an airtight seal. Chill for at least 4 hours (overnight is best) in the freezer. For serving, let it sit at room temperature for just 10-15 minutes to soften slightly without melting completely.
What’s the best way to store leftovers?
Wrap individual slices tightly in plastic wrap or aluminum foil, then place them back in the freezer. This cake keeps for up to 1 week in the freezer. To serve, let slices thaw at room temperature for 15-20 minutes. For extra protection, double-wrap the entire cake before freezing—this prevents freezer burn and keeps the layers intact for cleaner slices.
Can I substitute the peanut butter frosting?
For a nut-free version, replace the peanut butter with 2 cups cream cheese + 1 cup powdered sugar, whipped until smooth. For a chocolate twist, use 1 cup melted dark chocolate + 1 cup powdered sugar, cooled slightly before spreading. The key is maintaining a thick, spreadable consistency that binds the cake layers together.
Why did my cake turn out dense instead of light?
Overmixing the batter or overbaking are the most common culprits. Mix just until combined after adding dry ingredients, and bake until a toothpick comes out with moist crumbs (not wet batter). Also, ensure your butter and eggs are room temperature—cold ingredients can cause dense texture. If using a different cocoa powder, adjust the amount slightly (Dutch-processed cocoa is more concentrated).